Administrator Tools
Users with administrator rights have access to a variety of tools and settings to customize the application for their agency.
Administry Setup
Access setup by clicking on Setup in the Admin menu. To edit a setting, click on its row and a detail box will open on the right side of the screen. Click save after making edits or click another row to discard changes. More information about individual settings are below:
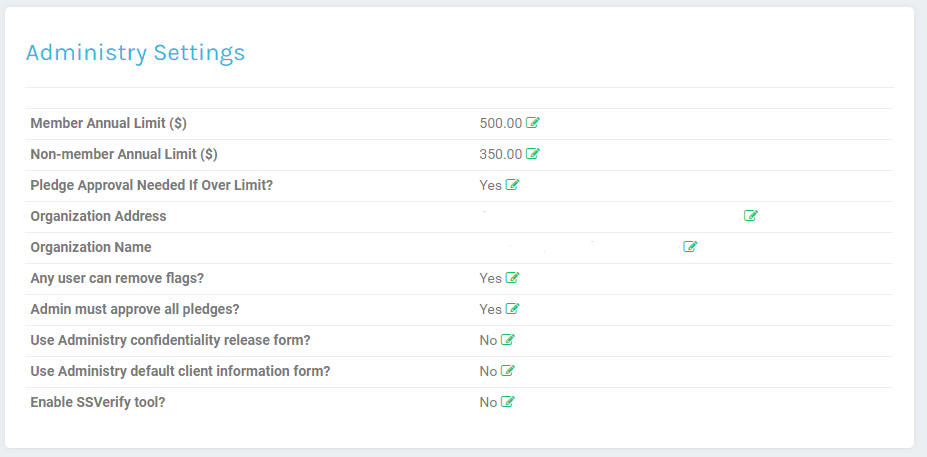
- Member Annual Limit ($)
- (Type: Dollar amount. Do not add the dollar sign ($), but decimal point is OK.) Sets the annual pledge limit for clients marked as members. Many churches and agencies set a higher pledge limit for clients who are actively involved in church or parish life. Individual clients are assigned member or non-member status on their client dashboards. An administrator can approve a pledge over this pledge limit. Pledge limits calculations are based on a rolling calendar - they include all pledges within the past 12 months, and do not reset on January 1st.
- Non-member Annual Limit ($)
- (Type: Dollar amount. Do not add the dollar sign ($), but decimal point is OK.) Sets the annual pledge limit for clients marked as non-members. Many churches and agencies set a higher pledge limit for clients who are actively involved in church or parish life. Individual clients are assigned member or non-member status on their client dashboards. An administrator can approve a pledge over this pledge limit. Pledge limits calculations are based on a rolling calendar - they include all pledges within the past 12 months, and do not reset on January 1st.
- Pledge Approval Needed If Over Limit?
- (Type: Yes/No) Set this to ‘Yes’ if an administrator should be required to approve any pledges over the pledge limit.
- Organization Address
- (Type: Text) The organization’s mailing address. Changing this field will NOT affect the organization’s billing details or how the name of the agency appears to other agencies.
- Organization Name
- (Type: Text) The organization’s name, which appears in multiple places throughout Administry. Changing this field will NOT affect the organization’s billing details or how the name of the agency appears to other agencies.
- Any user can remove flags?
- (Type: Yes/No) Set this to ‘No’ if only administrators should be allowed to delete client flags. some flags prevent pledges.
- Admin must approve all pledges?
- (Type: Yes/No) Set this to ‘Yes’ if an administrator should be required to approve all pledges regardless of amount, vendor, or other factors.
- Use Administry confidentiality release form?
- (Type: Yes/No) Set this to ‘Yes’ to display the Client Confidentiality Form (CCF) in the Resource List. As explained in our Terms of Use document, Administry strongly recommends using this form to inform clients of their rights, and to capture their consent.
- Use Administry default client information form?
- (Type: Yes/No) Set this to ‘Yes’ to display the Client Information Form (CIF) in the Resource List. As explained in our Terms of Use document, Administry strongly recommends using this form to collect demographic information about clients.
- Enable SSVerify tool?
- (Type: Yes/No) Set this to ‘Yes’ to show the ‘SSVerify’ option in the Client Dashboard menu. This is a tool to ensure clients are who they say they are. When clients request assistance, caseworkers can use SSVerify to save a securely hashed copy of the client’s social security number. Then, caseworkers can verify that clients are using the same social security each time they return for assistance.
- Enable Payments module?
- (Type: Yes/No) Set this to ‘Yes’ to enable the Payments module in Administry. Only Data Managers and Admin will be able to view and add/edit payment data for pledges.
Data Export Utility
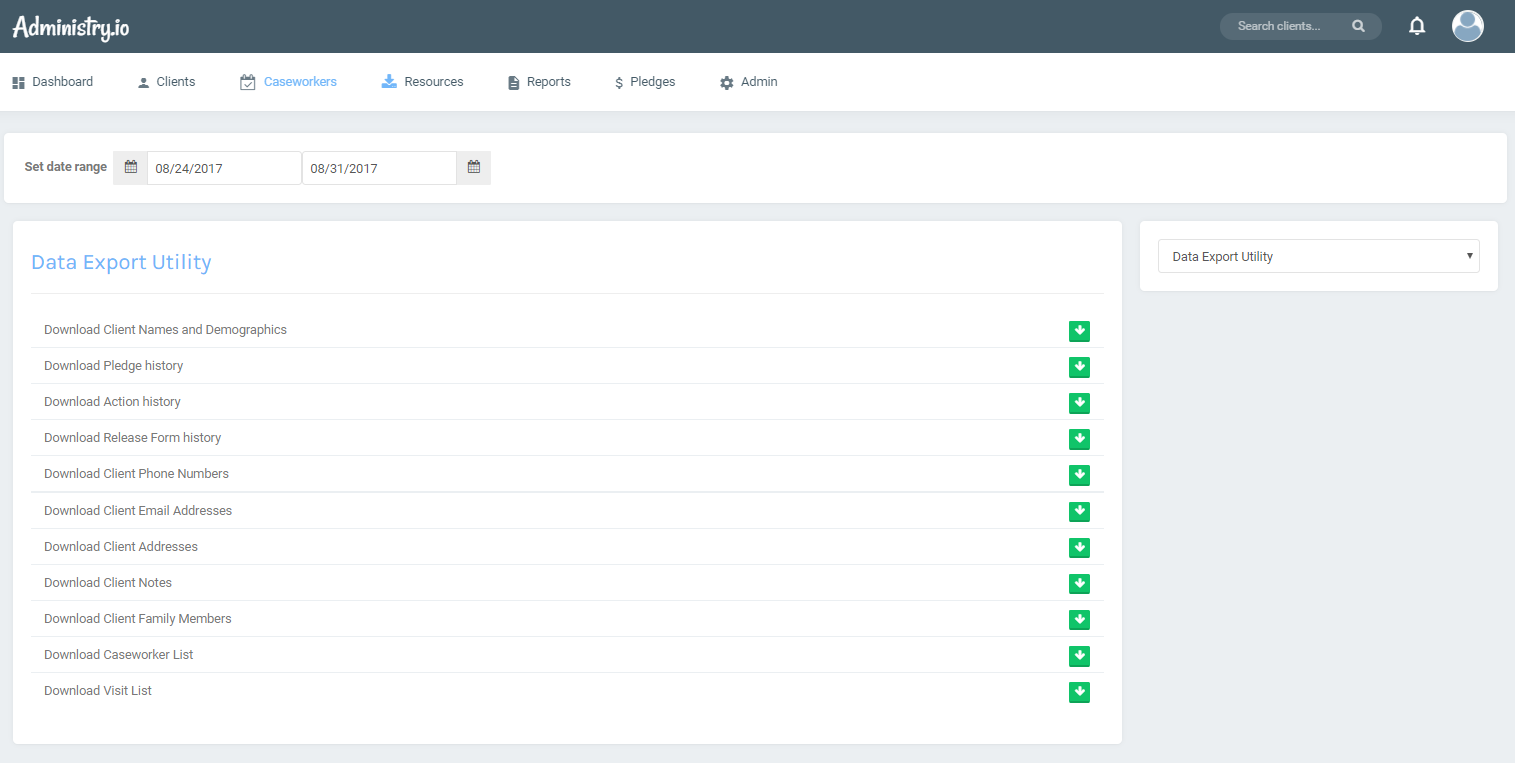
Agency administrators may choose to periodically export their agency data with the Data Export Utility. To launch the tool:
- Click on Settings under the Admin menu.
- Once the Settings page loads, click on the Settings dropdown menu on the top righthand corner of the screen. Select Data Export Utility.
- Once the Data Export Utility loads, use the date filter at the top of the screen to limit the data export. (Note: some exports are not date-driven.)
- For each type of data, click on the green download button. A download should begin momentarily.
- Depending on your browser, you should see a Save As dialogue box, or you should see the file at the bottom of your screen. You can also check your browser’s Download tab (Ctrl+J in Chrome, Firefox, and Internet Explorer) to view recent downloads.
- Files are downloaded in CSV format, and should open with Microsoft Excel.
Demographics Setup

Administry tracks several demographic categories such as race, gender, highest education level and marital status. Several default categories are loaded automatically, but you can add and edit categories as necessary.
To add or edit demographic categories:
- Under the Admin menu, select Administry Settings.
- Once the Settings page loads, click on the Settings dropdown menu on the top righthand corner of the screen. Select Demographic Categories.
- Choose a demographic category from the tabs on the right side of the screen. A list of active categories are displayed below.
- Edit an existing option by clicking Edit, or delete an option by clicking Delete.
Note
Deleting demographic entries will also delete corresponding demographic information associated with clients. For instance, deleting a marital status will result in any clients with that status being set to null.
Email Notifications
Adminsitry can notify you via email when certain events take place in Administry. For instance, Administry can alert you via email whenever a pledge requires approval or whenever a new client is added.
Note
Only Administrator or Data Manager users may receive email notifications from Administry.
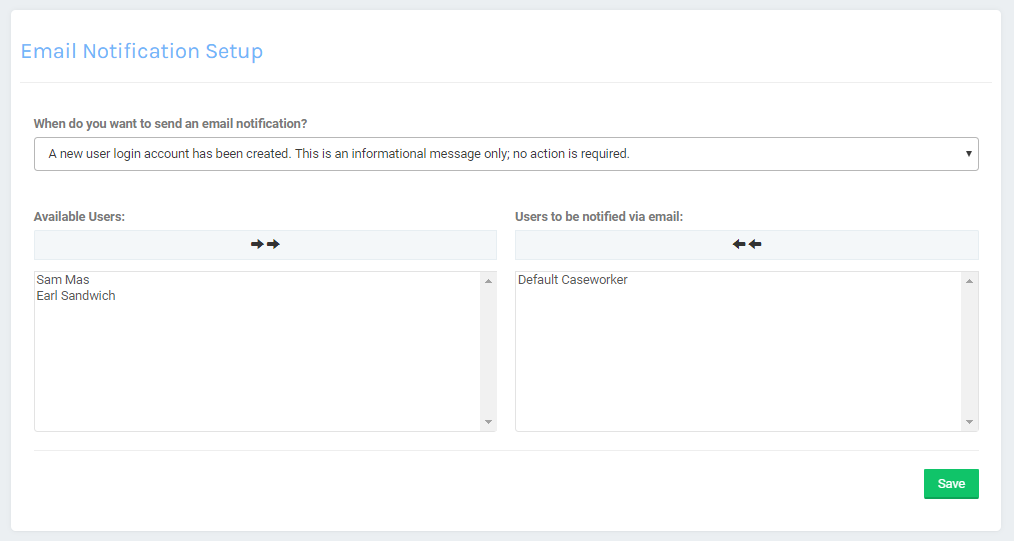
To set up email notifications:
- Under the Admin menu, select Administry Settings.
- Once the Settings page loads, click on the Settings dropdown menu on the top righthand corner of the screen. Select Change Email Notification Settings.
- Choose an event from the dropdown list. This will load two list boxes.
- Choose users from the first list to receive email notifications for the selected event by clicking on the user’s name. This will move the user to the second list.
- Add as many users as desired; all users will receive an email alert whenever the selected event takes place.
- Click the double arrow at the top of the list to move all names between lists.
- Click Save
Note
Users may disable email notifications in their user profile.